【C#】Winform自定义图像控件实现滚动缩放效果、拖动显示图像
|
admin 2025年3月30日 17:26
本文热度 1653
2025年3月30日 17:26
本文热度 1653
|
“ 本文描述了如何使用Winform创建用户图像控件、实现滚动缩放效果,拖动显示图像。”
前言
PictureBox 是 Windows Forms (WinForms) 中的一个内置控件,专门用于在窗体上显示图像,其可以显示多种格式的图像(如:BMP、JPEG、GIF、PNG、ICO 等)。
PictureBox 内置了如下几种图像显示方式:Normal:图像放置在控件的左上角,不缩放。
StretchImage:拉伸图像以填充控件。
AutoSize:调整控件大小以适应图像。
CenterImage:图像居中显示,不缩放。
Zoom:按比例缩放图像,保持纵横比。
上面的图像显示方法只能实现基本的图像功能,。如果想要实现更好的体验效果。还需要自定义一些功能,下面就是自定义一个图像用户控件实现滚动鼠标缩放图像、鼠标拖动显示图像。
运行环境 系 统:Win11
开发工具:Visual Studio 2022
相关技术:C# 、Winform .Net Framework 4.6.0
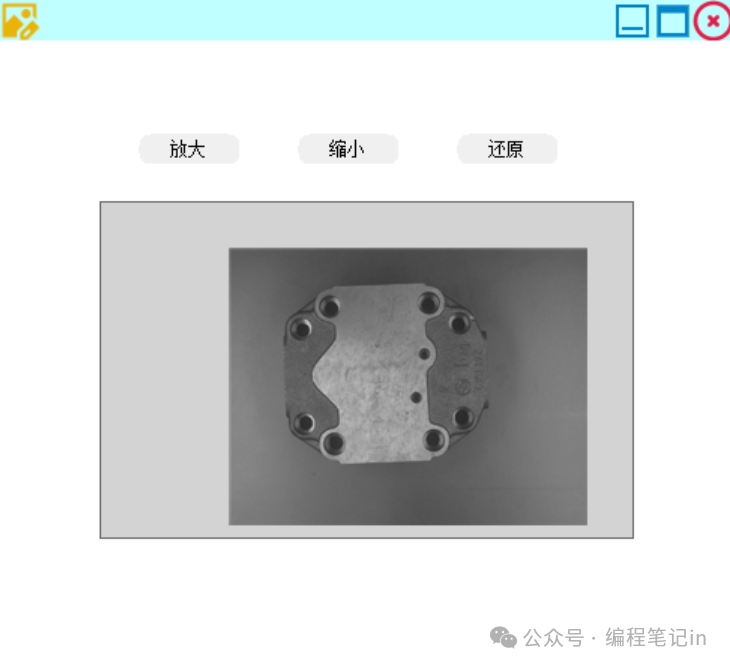
实现功能 1、鼠标双击还原
2、鼠标滚动缩放:放大、缩小
3、点击按钮:放大、缩小、还原
4、鼠标按住拖动图像
运行效果
图像控件代码
下面是自定义图像控件代码: public partial class UCPictrueBox : UserControl { #region 字段、属性 #region 字段 private Image _image; private float _zoomFactor = 1.0f; private const float ZoomIncrement = 0.1f; private const float MinZoom = 0.01f; private const float MaxZoom = 20.0f; private Point _lastLocation; private bool _isDragging = false; private PointF _imagePosition = PointF.Empty; #endregion #region 属性 [Description("获取或设置控件显示的图像。")] [Category("UserDefine")] public Image Image { get => _image; set { _image = value; _zoomFactor = 1.0f; _imagePosition = PointF.Empty; ImageCenter(); Invalidate(); } } #endregion #endregion #region 构造函数 public UCPictrueBox() { InitializeComponent(); this.DoubleBuffered = true; this.BackColor = Color.LightGray; this.BorderStyle = BorderStyle.FixedSingle; this.MouseWheel += ImageZoom_MouseWheel; this.MouseDown += ImageZoom_MouseDown; this.MouseMove += ImageZoom_MouseMove; this.MouseUp += ImageZoom_MouseUp; this.MouseDoubleClick += ImageZoom_MouseDoubleClick; } #endregion #region 图像操作 private void ImageCenter() { if (_image == null) return; Size scaledSize = GetScaledSize(); _imagePosition = new PointF((this.ClientSize.Width - scaledSize.Width) / 2f, (this.ClientSize.Height - scaledSize.Height) / 2f); Invalidate(); } private void Zoom(float factor) { if (_image == null) return; Point mousePos = this.PointToClient(MousePosition); Size scaledSize = GetScaledSize(); float mouseXRelative = (mousePos.X - _imagePosition.X) / scaledSize.Width; float mouseYRelative = (mousePos.Y - _imagePosition.Y) / scaledSize.Height; float newZoom = _zoomFactor + factor; newZoom = Math.Max(MinZoom, Math.Min(MaxZoom, newZoom)); if (Math.Abs(newZoom - _zoomFactor) > 0.01f) { _zoomFactor = newZoom; Size newSize = GetScaledSize(); _imagePosition = new PointF(mousePos.X - mouseXRelative * newSize.Width, mousePos.Y - mouseYRelative * newSize.Height); if (newSize.Width <= this.ClientSize.Width && newSize.Height <= this.ClientSize.Height) { ImageCenter(); } Invalidate(); } } public void ZoomIn() { Zoom(ZoomIncrement); } public void ZoomOut() { Zoom(-ZoomIncrement); } public void ZoomReset() { _zoomFactor = 1.0f; ImageCenter(); } private Size GetScaledSize() { return new Size((int)(_image.Width * _zoomFactor), (int)(_image.Height * _zoomFactor)); } #endregion #region 事件方法重写 protected override void OnPaint(PaintEventArgs e) { base.OnPaint(e); if (_image == null) return; Size scaleSize = GetScaledSize(); Rectangle destRect; if (_imagePosition == PointF.Empty) { int x = (this.ClientSize.Width - scaleSize.Width) / 2; int y = (this.ClientSize.Height - scaleSize.Height) / 2; destRect = new Rectangle(x, y, scaleSize.Width, scaleSize.Height); } else { destRect = new Rectangle( (int)_imagePosition.X, (int)_imagePosition.Y, scaleSize.Width, scaleSize.Height); } e.Graphics.InterpolationMode = System.Drawing.Drawing2D.InterpolationMode.HighQualityBicubic; e.Graphics.DrawImage(_image, destRect); } protected override void OnResize(EventArgs e) { base.OnResize(e); if (_image != null) { Size scaledSize = GetScaledSize(); if (scaledSize.Width <= this.ClientSize.Width && scaledSize.Height <= this.ClientSize.Height) { ImageCenter(); } } } #endregion #region 鼠标事件处理:滚轮缩放、按下拖拽、移动显示、松开取消拖拽、双击还原 private void ImageZoom_MouseWheel(object sender, MouseEventArgs e) { if (e.Delta > 0) { ZoomIn(); } else if (e.Delta < 0) { ZoomOut(); } } private void ImageZoom_MouseDown(object sender, MouseEventArgs e) { if (e.Button == MouseButtons.Left && _image != null) { _lastLocation = e.Location; _isDragging = true; this.Cursor = Cursors.Hand; } } private void ImageZoom_MouseMove(object sender, MouseEventArgs e) { if (_isDragging && _image != null) { int deltaX = e.X - _lastLocation.X; int deltaY = e.Y - _lastLocation.Y; _imagePosition.X += deltaX; _imagePosition.Y += deltaY; _lastLocation = e.Location; Invalidate(); } } private void ImageZoom_MouseUp(object sender, MouseEventArgs e) { _isDragging = false; this.Cursor = Cursors.Default; } private void ImageZoom_MouseDoubleClick(object sender, MouseEventArgs e) { ZoomReset(); } #endregion }
窗体代码
窗体代码,添加3个按钮即可。
public partial class MainForm : WinFormBase{ public MainForm() { InitializeComponent(); this.CenterToParent(); this.CenterToScreen(); } private void btn_ZoomIn_Click(object sender, System.EventArgs e) { ucPic_Image.ZoomIn(); } private void btn_ZoomOut_Click(object sender, System.EventArgs e) { ucPic_Image.ZoomOut(); } private void btn_Reset_Click(object sender, System.EventArgs e) { string filePath = Application.StartupPath + "\\source.png"; ucPic_Image.Image = Image.FromFile(filePath); }}
结语
使用方法,将自定义控件创建在同一个命名空间下,点击生成无报错后,即可在工具箱中查看选择自定义控件。拖拽到当前窗体即可。
如果是引用自定义控件类库分类实现,引用时可能得报错原因,目标框架不同。
如果想使用图中自定义窗体请查看。
阅读原文:原文链接
该文章在 2025/3/31 11:17:09 编辑过


 400 186 1886

